 I know Sian has sent an email to all Diploma students, but anyone else out there who is interested. What could be an interesting programme is on BBC2 this Friday 11th March at 9.00pm. Presented by Griff Rhys Jones; he is looking at the textile and embroidery traditions of India.
 the final part of chapter 8 (think i called it chapter 7 in my last post!!) required taking one of the designs from Part 1 and converting it into 'stitch'. i chose this one.
 i decided i wanted to make it light and lacy which was far removed from the original t shirt and the above design. so i took my original adaptation and printed it onto a cotton organdie (a la Maggie Grey method). i decided to concentrate mainly on the 'R's and the swirly bits. each R is made individually using a combination of photo's from the original piece, machine stitch, tissue, cellophane, the paper the organdie was printed onto and plain organdie. each R, except for the organdie ones has a base layer of yellow felt.
  the swirly bits are crocheted with a fine wire, looping randomly. the design is followed through by linking the image on the photograph with the original (if that makes sense). all outlines are machine stitched uniformally and the R's stitched together where they overlap with an invisible nylon thread so they look as if they are floating i hope. the whole thing measures 28cm wide and each R is 5.5cm high. as a postscript to this post i wanted to share some exhibition experiences.
 in my last post i said i was off to see 'Taking Time, Craft and the Slow Revolution'
.
i have in fact seen 3 exhibitions recently. when we left the somewhat disappointing slow craft (which i had waited over a year to see)! we found opposite one of the most stimulating exhibitions i have seen in a long while. 'Dominion' by Angela Cockayne at The Peninsula Art Gallery was based around the whale and only 2 textiles in sight! she reminded me of Joseph beuys with her use of fur, wax and resin. i find i am very critical of contemporary textile exhibitions now, also working in a museum i always end up looking at the way things are displayed and presented which can ruin the exhibition for me. the 3rd exhibition was in Bath, '50/50: working in parallel' at the Victoria Art Gallery was a joint exhibition by Cleo Mussi a mosaic artist (who made the above face and Matthew Harris who makes wonderful painterly textiles and whom i chose for one of my textile artists.
the work was based around a trip to Japan, a very colourful (Cleo's side) and exciting exhibition but i still enjoyed Angela Cockaynes best.
 these seem to have taken ages to do! anyway here goes with examples of edges.
#1 two using a combination of paper and cotton organdie, cutting, folding and looping up in the lower one.
 #2 i have been collecting milk bottle tops for ages and wanting to do something with them! they have been folded in half here and 'enclose' the edge. they are attached by a circular die and just held by the cutting (probably not very stable!). the lower one is a knitted zig-zag of silver wire, then folded to enclose the edge and secured with staples (catching both sides of the knitting).
 #3 newsprint folded to enclose the edge with holes stamped through and all secured with a scoobie
 #4 top one is basically a bound edge of clear plastic with a wire 'spring' threaded through afterwards. Lower one a bound edge enclosing paper twists.
 #5 top edge uses a mask to form the letters/squiggles, the organdie then painted, a metal wire chain applied with additional running stitch and sprayed using lolly stick masks! hope that makes sense! the middle one simple wire wrapped around a square shape many times and then opened out and loosely stitched to the edge of some ramie. lower edge composed of 2 layers, organdie and lutrador (sprayed with cap masks), attached paper strips, hand chain stitch and fishing line crochet to attach the dangling caps.
 #6 for Christmas i was given a wonderful book 'Just my Type' by Simon Garfield. its a book about fonts, the history of etc. the above 2 edges have use 'Totally Gothic' designed by Zuzana Licko. i loved it as soon as i saw it so there might be overkill! top edge used cut out shapes laid on felt and sprayed in layers with the final edge formed by cutting round the letters. the lower edge also on the same felt uses bits of paper, fabric, cellophane, melted straws etc to layer up applique letters.
 #7 top edge made up of 3 layers, lutrador, waxed newspaper and organdie on top. gathered with fishing line, tissue stuck over the ridges and iridescent shapes stitched into the ridges. the lower edge, more sprayed newspaper with cellophane gathered up and melted and stitched to felt.
 #8 more letters! top similar to #6 more newspaper and cellophane applied to organdie. the lower edge a combination of stencil and cut organdie.
 #9 top edge uses recycled metal, papers, sweet wrappers and net enclosed in acetate all joined together with other bits and stitched to edge of florist cellophane.lower edge based on sketches from my sketchbook, using card, painted organdie, sequins, paper and cellophane.
 #10 i took one of the braids i had made for a previous chapter and applied it to some black organdie. the lower edge used layers of tissue and random paint like marks worked with machine stitch.
 it occurred to me after working so many edges looking downwards, that they look quite different when turned the other way! i have made cacti!! anyway after my SLOW edges i am treating myself to 'Craft and the Slow Revolution' at Plymouth Museum tomorrow
.
 These are all self explanatory!!! Although the colour range is quite interesting!


 i have many articles and books on knitting, in particular Ruth Lee's 'Contemporary Knitting' is a great source of inspiration. i have used some of her techniques in my samples previously posted.
 there are a lot of artists using knit at the moment and i found it difficult not to go wild! however i have chosen a few that appeal to the quirky side of me and to their techniques some of which i experimented with in my chapter on knitting. i first came across Susie Freeman i think just after she had graduated when a friend asked me to make her wedding dress using some of Susie's fabric. it was great to be presented with a huge roll of this knitted construction and then realise i had to cut it to go into a 'v' at the centre front waistline!!! anyway it turned out beautifully. i also attended a couple of Knit days at the V&A organised by John Allen, this is where i discovered Nora Fok and Jan Truman. Nora has a touring exhibition on at the moment so do check it out, they are beautiful creations.
 Rhian Solomon, Adrienne Sloane
 Marie-Rose Lortet i encountered in a book on 'Outsider Art' i believe she is self taught, there is nothing traditional about her work which is why it is so fresh.
 thought i had better include some 'outdoor' work in keeping with my graffiti theme.Suzumi noda, Super Blue, Fay McCaul uses fibre optics to knit with.
 i have been monitoring this door for a few years now! it is a back door to my local library where various people 'hang out' and sometimes it smells quite savoury or un!!! initially it started with a few words/splodges etc and gradually layers built up and although it looked a bit of a mess i quite liked it .
 although it was random the colours worked and you could work out some of the individual layers.
 as a conservator i am quite interested in the idea behind 'how things were made', discovering their history and analysing their materials. with graffiti, layers are often built up, painted over/white washed, and painted over again. so the phrase 'you don't know it but its still there' has stuck in my mind. the council's anti graffiti unit has since made a complete hash of the door by trying to remove the graffiti! so it isn't there anymore!
 i started working out some of the letter layers on tracing paper with the intention of building something up, taking samples and embedding them in resin (like analysing paint layers). i love the lettering, individual words and shapes so i am not sure how far to adjust them to my own design or whether i can simply 'borrow' them.
 i would use a basic range of colours taken from the door as well as retroflective and phosphorescent threads and use a combination of cotton organdie and cellophane for my semi/transparent layers.
 as the graffiti is drawn by hand i want to recreate the colours with a mixture of stencils, sandwiched items and hand stitch, working randomly within the desired shapes.

 after many thoughts, ideas and designs i have come up with this. the initial piece would be directly in proportion to the original door and at the moment cut up systematically. although i have also thought of just taking a few samples and leaving the original as a hanging and ending up with 2 pieces. the samples would be laid on their sides and stuck into resin so part sticks out. i would then arrange them as a linked hanging. although i haven't totally got rid of the idea of turning it from a hanging to a panel. thought i would get feedback first.
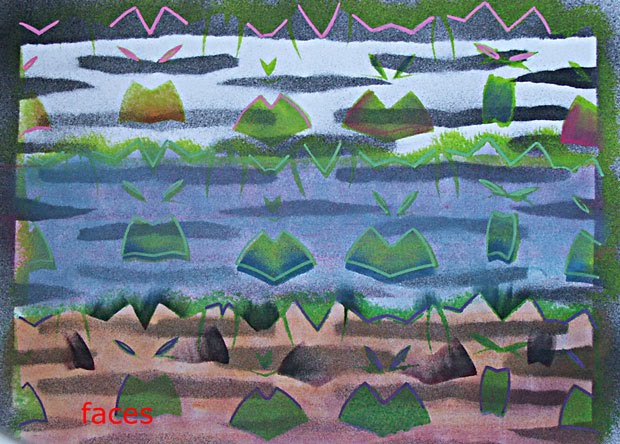 this option develops the use of stencils to create designs. Using paper folded and cut with shapes various 'doily' designs were created. the shapes i used were letters, arrows and random torn shapes. 'faces' above was based on the wonderful letters i used in the 'edge' chapter. i concertina'd the paper randomly to get a repeat that was not uniform. much to my surprise i created a row of faces which looked quite graffiti like. for this one i used 2 stencils, the background of folded and torn holes. i used spray paint, chalk pastels, markal paint sticks, acrylic paint and a new find 'uni posca' pens which give a brilliant colour. the pink and green lines above. i transferred the cut designs from thin paper to card which was easier to work with.
 'letters' above uses 2 stencils and only parts of them. again using the same materials.
 'y's' similar to 'letters'
 'm' using both positive and negative stencils.
 'flower' using 3 stencils randomly placed.
 'arrows' not so pleased with this one but it has a certain 1950's look. i used biro to give a more lacy appearance to the arrows.
 'grin' was based on an actual doily folded and cut randomly. it was quite difficult to use this as it was very flimsy to stencil over.
 i also worked various strips using the stencils, cut pieces from the stencils and the stencils themselves to create stripes. top stripe uses an actual stencil with pieces cut from the doily. next one down another stencil made from 'The Radio Times' and cut outs looped through it. the lower one using just stencils.
 this last one shows top created with positive and negative stencils with cutout bits of photos. next one down uses various sizes of arrow both positive and negative and cut outs. i still have a section designing on the computer but that will follow.

 the final part of chapter 8 (think i called it chapter 7 in my last post!!) required taking one of the designs from Part 1 and converting it into 'stitch'. i chose this one.
 i decided i wanted to make it light and lacy which was far removed from the original t shirt and the above design. so i took my original adaptation and printed it onto a cotton organdie (a la Maggie Grey method). i decided to concentrate mainly on the 'R's and the swirly bits. each R is made individually using a combination of photo's from the original piece, machine stitch, tissue, cellophane, the paper the organdie was printed onto and plain organdie. each R, except for the organdie ones has a base layer of yellow felt.
  the swirly bits are crocheted with a fine wire, looping randomly. the design is followed through by linking the image on the photograph with the original (if that makes sense). all outlines are machine stitched uniformally and the R's stitched together where they overlap with an invisible nylon thread so they look as if they are floating i hope. the whole thing measures 28cm wide and each R is 5.5cm high. as a postscript to this post i wanted to share some exhibition experiences.
 in my last post i said i was off to see 'Taking Time, Craft and the Slow Revolution'. i have in fact seen 3 exhibitions recently. when we left the somewhat disappointing slow craft (which i had waited over a year to see)! we found opposite one of the most stimulating exhibitions i have seen in a long while. 'Dominion' by Angela Cockayne at The Peninsula Art Gallery was based around the whale and only 2 textiles in sight! she reminded me of Joseph beuys with her use of fur, wax and resin. i find i am very critical of contemporary textile exhibitions now, also working in a museum i always end up looking at the way things are displayed and presented which can ruin the exhibition for me. the 3rd exhibition was in Bath, '50/50: working in parallel' at the Victoria Art Gallery was a joint exhibition by Cleo Mussi a mosaic artist (who made the above face and Matthew Harris who makes wonderful painterly textiles and whom i chose for one of my textile artists. the work was based around a trip to Japan, a very colourful (Cleo's side) and exciting exhibition but i still enjoyed Angela Cockaynes best.
 these seem to have taken ages to do! anyway here goes with examples of edges.
 #2 i have been collecting milk bottle tops for ages and wanting to do something with them! they have been folded in half here and 'enclose' the edge. they are attached by a circular die and just held by the cutting (probably not very stable!). the lower one is a knitted zig-zag of silver wire, then folded to enclose the edge and secured with staples (catching both sides of the knitting).
 #3 newsprint folded to enclose the edge with holes stamped through and all secured with a scoobie
 #4 top one is basically a bound edge of clear plastic with a wire 'spring' threaded through afterwards. Lower one a bound edge enclosing paper twists.
 #5 top edge uses a mask to form the letters/squiggles, the organdie then painted, a metal wire chain applied with additional running stitch and sprayed using lolly stick masks! hope that makes sense! the middle one simple wire wrapped around a square shape many times and then opened out and loosely stitched to the edge of some ramie. lower edge composed of 2 layers, organdie and lutrador (sprayed with cap masks), attached paper strips, hand chain stitch and fishing line crochet to attach the dangling caps.
 #6 for Christmas i was given a wonderful book 'Just my Type' by Simon Garfield. its a book about fonts, the history of etc. the above 2 edges have use 'Totally Gothic' designed by Zuzana Licko. i loved it as soon as i saw it so there might be overkill! top edge used cut out shapes laid on felt and sprayed in layers with the final edge formed by cutting round the letters. the lower edge also on the same felt uses bits of paper, fabric, cellophane, melted straws etc to layer up applique letters.
 #7 top edge made up of 3 layers, lutrador, waxed newspaper and organdie on top. gathered with fishing line, tissue stuck over the ridges and iridescent shapes stitched into the ridges. the lower edge, more sprayed newspaper with cellophane gathered up and melted and stitched to felt.
 #8 more letters! top similar to #6 more newspaper and cellophane applied to organdie. the lower edge a combination of stencil and cut organdie.
 #9 top edge uses recycled metal, papers, sweet wrappers and net enclosed in acetate all joined together with other bits and stitched to edge of florist cellophane.lower edge based on sketches from my sketchbook, using card, painted organdie, sequins, paper and cellophane.
 #10 i took one of the braids i had made for a previous chapter and applied it to some black organdie. the lower edge used layers of tissue and random paint like marks worked with machine stitch.
 it occurred to me after working so many edges looking downwards, that they look quite different when turned the other way! i have made cacti!! anyway after my SLOW edges i am treating myself to 'Craft and the Slow Revolution' at Plymouth Museum tomorrow.

