continuing to make the rest of my windmills. all 64 have been made, they just need to finish the actual construction now!
it takes time cutting them out, not to mention the stitching together in the first place and then removing the excess tissue from the back but i am pleased with what i have achieved so far.
i have found a way to stiffen them without adding wire to the outside. once they have been constructed i paint the tissue side with a liquid resin, it makes the colours more intense and stiffens them at the same time. will show that later.
Sunday, 21 July 2013
Friday, 12 July 2013
Summer School with Louise Baldwin
we have had a great Summer School at Farncombe Estate. the memories that remain are heat,hills,hard work,laughter and sleepless nights but it was great to meet old friends and new. Louise Baldwin was a great tutor, very inspiring and generous with her knowledge.
we were basically playing with paper, stitch and fabric. our initial task was to make some 'coloured papers'.
we were then given 5 tasks to make a series of small pieces joining firstly 2 pieces together, then 3,4,5 and 6 using the above coloured papers and any 'found' pieces we had brought with us.
then we had to make a collage using again the paper we had coloured, found papers and any image we liked. i continued with the cloud shape i have used in my lace chapters.
we then had to turn it over and cut it up without considering the front! Difficult! then we added stitch etc to some of the pieces.
finally we were allowed to 'play' with a more considered approach. i have recently been thinking beyond the Diploma (if there is life after!) and sketching from reflections in windows/mirrors etc.so i based my 3 pieces on these images.
i felt exhausted when i got home and only beginning to surface into normality, i actually managed to work on my windmills today and have a tidy up. i will certainly use what i have learnt with Louise in the future.
we were basically playing with paper, stitch and fabric. our initial task was to make some 'coloured papers'.
![]() |
| using acrylic paint and scraping circles |
![]() |
| more scraping, sticking of spots and mark making |
![]() |
| as above |
we were then given 5 tasks to make a series of small pieces joining firstly 2 pieces together, then 3,4,5 and 6 using the above coloured papers and any 'found' pieces we had brought with us.
![]() |
| 2, 3, and 4 joins i knew there would be a use for those Rizzler roll up papers i picked up from the street |
![]() |
| 5 pieces joined |
![]() |
| 6 pieces joined and cut through |
then we had to make a collage using again the paper we had coloured, found papers and any image we liked. i continued with the cloud shape i have used in my lace chapters.
![]() |
| collage using pieces of potato printing from designs for my certificate |
we then had to turn it over and cut it up without considering the front! Difficult! then we added stitch etc to some of the pieces.
![]() |
| left piece has the addition of some tufted organza |
finally we were allowed to 'play' with a more considered approach. i have recently been thinking beyond the Diploma (if there is life after!) and sketching from reflections in windows/mirrors etc.so i based my 3 pieces on these images.
![]() |
| images of my bedroom window with mirror in front |
![]() |
| i have wanted to use that piece of sellotape for ages, this piece working with cotton organdie |
![]() |
| using lettering and pieces of paper stuck onto card, painted to give 3D effects and more organdie |
![]() |
| adding a piece of metal and spray paint |
i felt exhausted when i got home and only beginning to surface into normality, i actually managed to work on my windmills today and have a tidy up. i will certainly use what i have learnt with Louise in the future.
Saturday, 22 June 2013
Oh the windmills of my mind
i have started making windmills working out that it is probably best to make several in a strip before separating them. before starting this i saved the recording to use at a later date. i can get 10 in a strip and so far i have made 4 so only 2 more to go but i did decide to do this for myself didn't i?
attaching the tape to the Lutrador is quite therapeutic i tell myself.
i have used different words to secure all the layers together. this one says 'silent words'
i have chosen various colours of tissue paper to attach the strips to keeping them quite bright and seasidy.
so onward, need to have something to show at Summer School......
attaching the tape to the Lutrador is quite therapeutic i tell myself.
i have used different words to secure all the layers together. this one says 'silent words'
i have chosen various colours of tissue paper to attach the strips to keeping them quite bright and seasidy.
so onward, need to have something to show at Summer School......
Sunday, 9 June 2013
my day was made yesterday
Day trip to London and look what we saw!
el anatsui's sculpture hanging on the front of the Royal Academy. I'm studying him at the moment as i will include him in my study of the three embroiderers i have to do for this module. although he is technically a sculptor his work is amazing and directly relates to the idea of re-using items which i often do in my own work.
it was bright sunshine so quite difficult to photograph but a joy to see. that as well as Cornelia Parker and Souzou at the Wellcome Collection.
It went downhill when we went to the Natural History Museum. are we missing something; like the collections? soooooo hugely disappointing. Best bit is the building itself.
el anatsui's sculpture hanging on the front of the Royal Academy. I'm studying him at the moment as i will include him in my study of the three embroiderers i have to do for this module. although he is technically a sculptor his work is amazing and directly relates to the idea of re-using items which i often do in my own work.
it was bright sunshine so quite difficult to photograph but a joy to see. that as well as Cornelia Parker and Souzou at the Wellcome Collection.
It went downhill when we went to the Natural History Museum. are we missing something; like the collections? soooooo hugely disappointing. Best bit is the building itself.
Monday, 27 May 2013
Addendum to last post
having posted my ideas i went away and had more thoughts!
i was wondering whether this net was too coarse looking and although i would dye/paint it to be more in keeping i still wanted to investigate a more transparent net.
i decided to try machine stitching a grid with clear nylon thread using newspaper as a support which i would then wash out after.
i am really pleased with this but realise it is not hugely original and quite delicate so wonder how it might stand up to a windy beach?
is it also too similar a technique to the windmill? Ideas anyone?
![]() |
| windmill behind linen thread net |
i decided to try machine stitching a grid with clear nylon thread using newspaper as a support which i would then wash out after.
![]() |
| finished net sample |
![]() |
| sample details together |
Friday, 24 May 2013
Return to PAPy bread
short recap on my proposal and where i am going with it.
Plan is to make a site specific piece for this beach based on graffiti but silent. see previous post here
i have finally chosen my graffiti sound, a sound totally out of place to a hopefully cold and quiet beach. i intend to record the sound of my son on the computer and his inane banter he has with his friends on Skype. with a c 60 tape; 1 hour to those of you who don't remember cassette tapes. i have worked out i should be able to make 60 windmills! Oh i love repetition.
i have been investigating how or what to attach the windmills to. originally i was thinking of having them en mass sticking up from the beach and i know Siân had mentioned to me Anthony Gormley's beach bodies is a 'whole' piece and not physically linked but as this really is a 'single' piece i have been thinking of ways to connect them.
i like simple so after going off at a tangent with windmills in boats which i decided was not in keeping with the idea behind my initial thoughts i have been investigating fishing nets. the idea to attach the windmills to a net so they can spin. i have tried various samples using paper thread, fishing line and finally cotton Perle.
i have taught myself to make fishing net thanks to the power of you tube! i made my own shuttle and done various experiments. fishing line did my eyes in though i love the idea of the transparency of it.
Perle is quite floppy and i was thinking i would need something more rigid so i have played with soaking the finished piece in resin which has the desired effect.
However i have had an epiphany and think that because the use of the Internet and Skype is essentially an 'enclosed' activity i want to collect all the windmills into an enclosed net, so bits of 'noise graffiti' will leak out.
and this is for you Siân!
i came across this here some time ago when i was putting my proposal together.
![]() |
| Budleigh beach in East Devon |
![]() |
| windmills |
![]() |
| various nets |
i like simple so after going off at a tangent with windmills in boats which i decided was not in keeping with the idea behind my initial thoughts i have been investigating fishing nets. the idea to attach the windmills to a net so they can spin. i have tried various samples using paper thread, fishing line and finally cotton Perle.
i have taught myself to make fishing net thanks to the power of you tube! i made my own shuttle and done various experiments. fishing line did my eyes in though i love the idea of the transparency of it.
![]() |
| making new rows of loops with a spacer |
![]() |
| experimenting with resin |
However i have had an epiphany and think that because the use of the Internet and Skype is essentially an 'enclosed' activity i want to collect all the windmills into an enclosed net, so bits of 'noise graffiti' will leak out.
and this is for you Siân!
i came across this here some time ago when i was putting my proposal together.
Labels:
budleigh salterton,
fishing nets,
graffiti,
sonic fabric
Friday, 10 May 2013
Bonded layers (Chapters 9 and 10)
Chapter 9
it's taken me a long time to do this chapter, can't say its been my favourite, till i got to the 'Resolved' pieces!! any way here goes.
the idea was to make lace like structures by applying 'bits' of things to an adhesive layer, i used a 'Bonda web' which i had got from Whaleys. my first piece i sandwiched between adhesive ( sample 3 ) but then i decided it worked just as well on a single layer.
Note Siân the scale!
the next thing was to cut out shapes of these 'lace' bits and attach them to back grounds. the piece above was a remnant from last years summer school with thread 'lace' and a sample of black silk fibres i had formed into rings and applied to the adhesive. can't say i like this one
Chapter 10
the above sample uses stitched elements and then heat to melt through the various layers and thus bonding them together.
Resolved Sample 1
i wanted to get back to some colour! some time ago i bought a pack of light sensitive fabric which i had never used. so i used an old piece of type to cut a stencil and placed it on the fabric in bright sunlight(!) in a couple of areas, top left and far right dark green 'K's. you then wash the fabric and this leaves the 'set' image visible. i then placed a dark blue nylon layer on top and cut out 2 'K's from my 'lace' pieces and attached them to the piece (top right and bottom right). i then stitched lines across the background and then took a heat tool to it to reveal the green underneath. finally i cut a metal 'K' and held it in place with more of the blue nylon and an adhesive layer and emphasised the silver with stitch around the other 'K'.
Resolved Sample 2
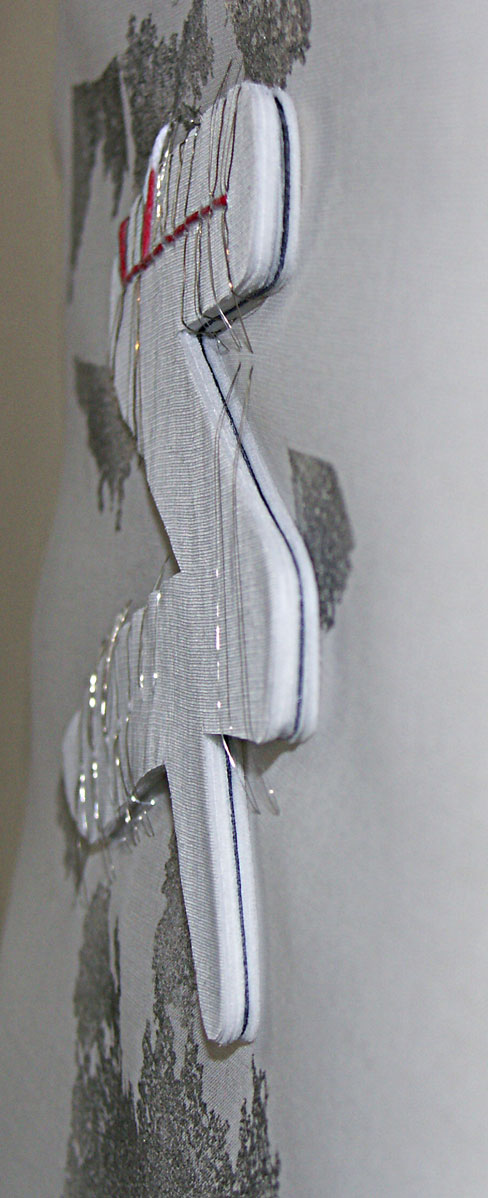
i was thinking about bonding more than just a few layers and wondered whether i could create real bulk. i was looking back on my sketchbook and thought of using this as inspiration, instead of going downwards i wanted to go up!
my first layer was paper, the black line seen half way through, i then built up layers, it was very labour intensive but i am really pleased with the outcome. half way through i had had enough but didn't think it was thick enough so i came back to it and worked from the other side. i drilled the holes and attached it 'a la Gulliver' to a single layer of organdie. the bonda web on the background i coloured by spraying with spray paint. i think i would like to investigate this further when i have the time and patience!
it's taken me a long time to do this chapter, can't say its been my favourite, till i got to the 'Resolved' pieces!! any way here goes.
the idea was to make lace like structures by applying 'bits' of things to an adhesive layer, i used a 'Bonda web' which i had got from Whaleys. my first piece i sandwiched between adhesive ( sample 3 ) but then i decided it worked just as well on a single layer.
Note Siân the scale!
![]() |
| these are left over scraps of japanese paper i had inkjet printed on |
![]() |
| this sample i painted the adhesive layer and used old 'used' bits of sellotape i had taken off the back of some old photos it had that lovely old yellowness and had lost its stick |
![]() |
| offcuts of thread |
![]() |
![]() | ||
| for this piece i coloured the adhesive with liquid graphite and stuck black plastic pieces i had removed from a piece in Chapter 8. it was then attached to a sample from an earlier chapter |
Chapter 10
![]() |
| Nylon layer with bonded silver leaf, rusted plastic and garden fleece. |
Resolved Sample 1
![]() |
| using letters to create individual elements |
![]() |
| detail |
i was thinking about bonding more than just a few layers and wondered whether i could create real bulk. i was looking back on my sketchbook and thought of using this as inspiration, instead of going downwards i wanted to go up!
![]() |
| image on the right |
![]() |
| image created by bonding 36 layers (approx) of cotton organdie |
![]() |
| it measures about 5mm deep |
my first layer was paper, the black line seen half way through, i then built up layers, it was very labour intensive but i am really pleased with the outcome. half way through i had had enough but didn't think it was thick enough so i came back to it and worked from the other side. i drilled the holes and attached it 'a la Gulliver' to a single layer of organdie. the bonda web on the background i coloured by spraying with spray paint. i think i would like to investigate this further when i have the time and patience!
Subscribe to:
Posts (Atom)


