Friday, 31 January 2014

New Work

i have been working on something to show at the NEC in Birmingham in March as part of the South West Textile Group. the brief was to use a 30cm square canvas and have a Romano, Celtic, medieval theme using a certain palette of colours.
i have been thinking of 'voids' for a while now. spaces left by things that are no longer there so for this piece i have been looking at Roman wax writing tablets and the marks left behind on the wood.
wax would be melted into the middle section and then words scraped into the hard wax with a metal stylus.
as usual i got carried away with various drawings.


got a bit carried away with the colours on this one.

 i then made a sample of undyed merino wool felt with oxidised copper strips stamped with letters. i also made a mould of a stack of strips which i have filled with paper pulp and painted with charcoal. the plan is to have lots of dangly metal strips, paper pulp and newsprint pieces simulating scratched voids.
sample
i have started the main piece so will post more later

Friday, 10 January 2014

I have it!

i have my Diploma certificate yippee. Thanks Siân for being such a great teacher and to everyone else on the course who has ever given me encouragement, comments and companionship at summer schools. please continue to pop in and see how i do..... so watch this space.

Sunday, 22 December 2013

Wishing everyone a very Happy Christmas

I hope everyone has a great Christmas and a very creative 2014

Saturday, 23 November 2013

Ta Da

i can't say this has been easy but here it is!


Last post except for the video, the T shirt and the cuddly toy

so to recap: site specific for Budleigh Salterton Beach
drawing of proposed positioning
after a long time of waiting for the piece to come back to me and a few failed attempts of photography due to weather etc i finally got to Budleigh yesterday. the weather was perfect there was even a breeze.
Budleigh about 11.30am Friday 22nd November
firstly i placed my piece where i had intended it to go and as i was on the bus i realised it was two years ago that i had done my visit to Budleigh for ideas so i was worried that it would not be the same! i shouldn't have worried as things move slowly down here!
Even the boat was still there to lay the piece in front of
it was surprising how small it looked when laid out!
 its quite tricky manoeuvring a lightweight textile from a bag with tissue wrapping on a beach in a breeze! i managed!
attached to a beach hut but here the bright light was against me
i then took it to the beach huts and played
more Escher like birds
i have to admit i was quite nervous at first working on a public beach, i did see a couple of fishermen looking at me oddly and one lady came up saying how beautiful and how long had it taken to make and "i wouldn't put it down there its all oily!" it did smell of the beach when i got it home!


and another authentication picture, the kind i can cope with!
video to follow when i work out how to edit!

Friday, 1 November 2013

Possibly the penultimate post for my Diploma

Firstly the pretty pictures of my assessment piece in-situ at Lyme Regis as part of the South West Textile Group exhibition 'Suspension'. to show scale i am including the surroundings so i hope no one else minds me showing their pieces too.
i have to confess i didn't hang it and had hoped it would trail the floor but perhaps for practical reasons as it was near the door it was hung high and restrained at the bottom.
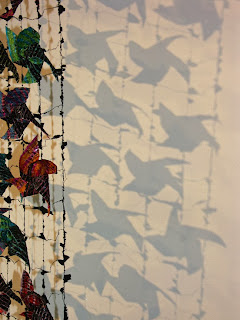
Escher type shadows of birds?
now for the paperwork!
So far the actual making took a total of 88 hours

Materials and costings


Lutrador                                    £02.50

Double sided tape                            00.50
Garden fleece                                00.20
Tissue paper                                 01.00
Nylon thread x 5 reels                       10.50
Newspaper                                    00.60
Warhammer  Spray paint                       09.80
Resin                                        01.95
Crazy wire company wire                      01.99
Perspex rods                                 03.00
 
Total                                       £32.04


Health and Safety typical to Module 6
Use of Hot Air gun/wood burning tool

·        Hold item being worked on carefully and away from direct heat source

·         Use in well ventilated area

·        Protect work surfaces at all times

Use of paints/dyes and spray paint etc:

·        Use in well ventilated area/use dust mask when using powders. I used the black spray paint in the garden hoping the neighbours wouldn’t complain too much

·        Wear old or protective clothing and gloves where necessary.

·        Store on shelf well sealed.

Drilling through Perspex

I used a small electric craft drill but the problem with Perspex is that it heats up with the action of the drill, so short, sharp bursts on the drill are best; clearing out the hole and cleaning the bit as you go. Wear goggles and clamp the Perspex in position so it doesn’t move. Make sure the drill bit is screwed in tightly.


General health and safety

·        Always protect scalpel blades with a cork

·        Take care when lifting sewing machines

·        Sit correctly when using the sewing machine for long lengths of time

·        Always work in good light

·        As always ‘common sense’

and although i hate having my photograph taken here is the latest for authentication purposes! note the lobster pencil sharpener in the foreground. 


Sunday, 20 October 2013

Matthew Harris workshop

this time last week i was lucky enough to be on a workshop with Matthew Harris. there were 5 of us in Matthew's cosy studio. called 'from parts to a whole' we were asked to bring something to take apart! (Siân has been on one of these workshops dismantling an umbrella). anyway i took an old jewellery box of my mothers which had seen better days and i did not use.
it is leather, faded and repaired.

the object was meant to be mixed materials and anything with a history but not clothing. our group had a plug, dictaphone, book and gas mask amongst the items.
the first thing to do was to dismantle the box and save all the pieces.
i found it quite difficult as the box had been very well made so it took quite a while but eventually i had something to work with.
so from then on the workshop was run like a game all dependant on the roll of a dice. we worked through various criteria from choosing 3 different pieces to make a drawing instrument to what to draw and how to make items from the pieces by joining.
on day 2 we could expand and concentrate on a particular items or way of working we had particularly liked from the day before. i had made a bundle of 3 pieces and was keen to see what i could create with further bundles.
i made myself a set of rules!
pieces were placed in their materials type and chosen with the roll of the dice. then it was to see whether to keep them whole, cut down or pleated/folded. after that it was whether to make them into bundles or link them. then what to wrap or tie with and how many times..... it could go on forever but these are what i made.
Bundles
Links
i was also keen to explore the shapes made and wanted to spray them in true style, to see the voids left behind. so i wouldn't loose the colours i sprayed the reverse but i am really pleased with my reverse images.
i am sure this is leading me somewhere! i am quite excited about them so ..... i had a great time and Matthew was a perfect host and very generous with his knowledge. i recommend it to anyone.