Monday, 27 May 2013

Addendum to last post

having posted my ideas i went away and had more thoughts!

windmill behind linen thread net
 i was wondering whether this net was too coarse looking and although i would dye/paint it to be more in keeping i still wanted to investigate a more transparent net.
i decided to try machine stitching a grid with clear nylon thread using newspaper as a support which i would then wash out after.

finished net sample
 i am really pleased with this but realise it is not hugely original and quite delicate so wonder how it might stand up to a windy beach? 

sample details together
 is it also too similar a technique to the windmill? Ideas anyone?

Friday, 24 May 2013

Return to PAPy bread

short recap on my proposal and where i am going with it.

Budleigh beach in East Devon
 Plan is to make a site specific piece for this beach based on graffiti but silent. see previous post here


windmills
i have finally chosen my graffiti sound, a sound totally out of place to a hopefully cold and quiet beach. i intend to record the sound of my son on the computer and his inane banter he has with his friends on Skype. with a c 60 tape; 1 hour to those of you who don't remember cassette tapes. i have worked out i should be able to make 60 windmills! Oh i love repetition.

various nets
i have been investigating how or what to attach the windmills to. originally i was thinking of having them en mass sticking up from the beach and i know Siân had mentioned to me Anthony Gormley's beach bodies is a 'whole' piece and not physically linked but as this really is a 'single' piece i have been thinking of ways to connect them.

i like simple so after going off at a tangent with windmills in boats which i decided was not in keeping with the idea behind my initial thoughts i have been investigating fishing nets. the idea to attach the windmills to a net so they can spin. i have tried various samples using paper thread, fishing line and finally cotton Perle.

i have taught myself to make fishing net thanks to the power of you tube! i made my own shuttle and done various experiments. fishing line did my eyes in though i love the idea of the transparency of it.

making new rows of loops with a spacer
experimenting with resin
Perle is quite floppy and i was thinking i would need something more rigid so i have played with soaking the finished piece in resin which has the desired effect.

However i have had an epiphany and think that because the use of the Internet and Skype is essentially an 'enclosed' activity i want to collect all the windmills into an enclosed net, so bits of 'noise graffiti' will leak out.

and this is for you Siân!

i came across this here some time ago when i was putting my proposal together. 

Friday, 10 May 2013

Bonded layers (Chapters 9 and 10)

Chapter 9
it's taken me a long time to do this chapter, can't say its been my favourite, till i got to the 'Resolved' pieces!! any way here goes.

the idea was to make lace like structures by applying 'bits' of things to an adhesive layer, i used a 'Bonda web' which i had got from Whaleys. my first piece i sandwiched between adhesive ( sample 3 ) but then i decided it worked just as well on a single layer. 

Note Siân the scale!

these are left over scraps of japanese paper i had inkjet printed on 
this sample i painted the adhesive layer and used old 'used' bits of sellotape i had taken off the back of some old photos it had that lovely old yellowness and had lost its stick
offcuts of thread

 the next thing was to cut out shapes of these 'lace' bits and attach them to back grounds. the piece above was a remnant from last years summer school with thread 'lace' and a sample of black silk fibres i had formed into rings and applied to the adhesive. can't say i like this one

for this piece i coloured the adhesive with liquid graphite and stuck black plastic pieces i had removed from a piece in Chapter 8. it was then attached to a sample from an earlier chapter


Chapter 10

Nylon layer with bonded silver leaf, rusted plastic and garden fleece.
the above sample uses stitched elements and then heat to melt through the various layers and thus bonding them together. 

Resolved Sample 1

using letters to create individual elements
i wanted to get back to some colour! some time ago i bought a pack of light sensitive fabric which i had never used. so i used an old piece of type to cut a stencil and placed it on the fabric in bright sunlight(!) in a couple of areas, top left and far right dark green 'K's. you then wash the fabric and this leaves the 'set' image visible. i then placed a dark blue nylon layer on top and cut out 2 'K's from my 'lace' pieces and attached them to the piece (top right and bottom right). i then stitched lines across the background and then took a heat tool to it to reveal the green underneath. finally i cut a metal  'K' and held it in place with more of the blue nylon and an adhesive layer and emphasised the silver with stitch around the other 'K'.

detail
Resolved Sample 2
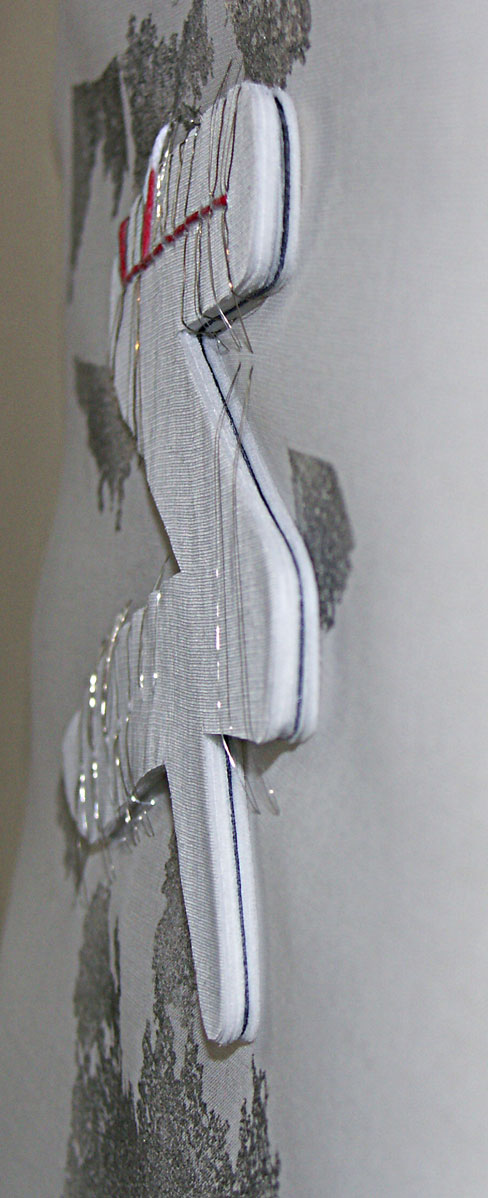
i was thinking about bonding more than just a few layers and wondered whether i could create real bulk. i was looking back on my sketchbook and thought of using this as inspiration, instead of going downwards i wanted to go up!

image on the right

image created by bonding 36 layers (approx) of cotton organdie


it measures about 5mm deep

my first layer was paper, the black line seen half way through, i then built up layers, it was very labour intensive but i am really pleased with the outcome. half way through i had had enough but didn't think it was thick enough so i came back to it and worked from the other side. i drilled the holes and attached it 'a la Gulliver' to a single layer of organdie. the bonda web on the background i coloured by spraying with spray paint. i think i would like to investigate this further when i have the time and patience!

Saturday, 13 April 2013

melting polythene.

Chapter 8 uses plastic materials fused together to create new surfaces i haven't photographed my collection of plastic but it was a mixture of shopping bags, plastic bags, ink cartridge bags and plastic file edges. i have taken Jane's influence and used a bottle top to show scale.
a silver plastic bag with punched holes. i stitched through some of the holes with a metal wire which obviously heated up and melted through the plastic.
testing with strips of polythene to fuse onto a base layer.
the sample on the left is made with a clear plastic bag and strips of plastic and paper encapsulated. stitch has been added. the sample on the right has been made from a strip cut from the left sample enclosed between 'Athena' plastic bag.
this is quite a thick piece. an opaque bag with clear plastic in between. the black is produced from acrylic paint on the inner layer.
more stripes taken from the sample in # 4 above.
utilising the handle hole.
detail of above.
strips of polythene sewn into black plastic. hand stitch added after to emphasise the black plastic strips.
 
this was a piece i made for my first 'Personal Assessment piece' with some plastic strips sewn through and then re-melted. for anyone who reads this and hasn't seen my PAP this was achieved with strips of plastic, knitted and then melted under tension.

garlic plastic bag with clear encapsulated strips added.
more strips cut and attached to a black carrier bag where the handle hadn't been fully removed. stitch was added and then the areas between cut out and re-melted.
as part of this chapter a resolved sample was asked for. i have done a few 'drawings' in my sketchbook based on more Aleut/Unangan textiles and chose one of these to follow into plastic.


resolved inspiration.
silver plastic bag with punched holes, sewn plastic strips, spray paint and strips cut and fused. stitch added after.


Friday, 29 March 2013

Beads and Quillwork

Chapter 6 is all about beads, collecting, making and using.

these are some found items that could be used for beads, toy gun caps, washers from umbrella making, metal work etc. I have coloured them with black spray paint in varying quantities.
i made some beads from paper pulp and then painted them. lower 'bead' is made from a bottle top mould so you can see the scale. the ones with the crosses on are from a chocolate box container and i must admit i got carried away with these so i have made rather a lot! the smaller ones are from cell battery packaging. i remembered and for these i made the pulp very fine.
i then tried making some beads with shrink plastic, coloured with felt tip and liquid graphite!the stitching is worked with horsehair.
these are the pieces after shrinkage with some additions and some wire beads. the brass bead is worked with french knitting and is less than a centimetre long. the liqiuid graphite crystallised when it was heated which has made it glisten. in some ways i prefer the beads pre shrinking!
some rolled beads, so from far right clockwise, rolled 'fimo' beads the white ones are glow in the dark, then some paper rolled and dipped in resin, perforated paper strip wound around and sprayed black, rolled and melted plastic, drinks can metal, oxidised wire mesh, knitted plastic that has been melted and rolled and finally rusted papers.
threaded bead work which i have never done before was great fun. i made a pattern loosely based on the gun cap and worked the bottom right piece in 'square stitch' with fine nylon thread. the piece to the left is loom woven, still on the loom because i might do some more and not sure how to finish off the warps! the warps are linen and the thread looping the beads through is guttermann sewing thread. the beads are tiny seed beads.
i stitched the first sample to a paper i had made in a previous chapter.
i then added some paper beads which i stuck in place.

as an antidote to the structured beads above i did some random crochet with made and found beads.
 
the thread used was fishing line


 Now for some quillwork.
this was great fun too. i used a mixture of paper, metal and plastic for the quill. its difficult not to do straight lines but i did try and vary it. there are far more stitches that can be done than i have done here! bottom right is worked with a drinking straw and staples.
 
the quillwork 'rosette' was quite tricky as the central thread only goes through the surface once as it it more of a pull loop linking everything together, so when you work it you are juggling with the bits in the middle flapping in the air until its all done around the outside and you can pull the drawstring; then of course you run out of strip halfway round and have to keep the tension going!

 i was greatly aided in this venture by: 
'The Technique of Porcupine Quill Decoration among the Indians of North America' by William C. Orchard, Eagles View Publishing, 1984.

'Quill and Beadwork of the Western Sioux' by Carrie A. Lyford, R.Schneider Publishers, 1983.

They both have excellent diagrams.
My favourite place to get fine beads is J.G.Beads Ltd. They have a wonderful selection of Japanese made beads.