Showing posts with label chapter 9. Show all posts

Saturday, 10 September 2011

Chapter 9 Section C more playing with paper

wow! this is going to be a long one!
Section C Exercise 1 was the formation of graded 3D shapes, working with simple shapes all of the same size, manipulating and connecting them in some way. #1 i used thick water colour paper with rectangular shapes and gradually curled an edge, connecting them with staples
#2 and 3 i used the same rectangular shape but curled and de-laminated the paper more with each step this was connected with string tied between each step with loops.

#4 i used tracing paper, again with a rectangle and linking each with string. each was gradually twisted more tightly.
#5 and 6 was worked with tracing paper again and rectangles. each was folded in half and stapled at the sides to make a pocket, then they were gradually opened and folded with a creases in the middle.
hanging up by the connecting string
Exercise 2 was to rip/cut several simple shapes and then divide it into two again and work with each shape separately (positive and negative)
#7 and 8 were with negative shapes and the aim was to make an undulating 'caterpillar'. #7 the pieces were connected with double sided tape and a spacer while #8 were threaded with metal wire.
#9 and 10 are the positive shapes folded and connected with shop tags. they look a bit Elizabethan ruff like.

Exercise 2 using colour and 3D shape. for this i went back to my 'R's' and stuck the yellow to the purple so they were double sided, joining up the graded yellows with the purples. i wanted again to make a sort of 'caterpillar' and found an old spiral for binding and stuck the 'R's' upright in the slots. i used 3 different sizes.
somehow from a distance they look quite bird like all with open beaks. the following are various viewpoints.


#5 changing the positioning
#6 i then decided to fold them and linked them together in various ways


#9 is working with the smaller 'R's linking them into shapes. i have found this chapter quite long to do! but this is possibly due to my lack of spare time at the moment however i hope i can now make some felt!

Wednesday, 31 August 2011

Chapter 9Section B

Section B colour and shape: Exercise 1. i chose for my shape (something that has an interesting silhouette) an 'R' and made 2 stencils of differing sizes. i then cut out numerous 'R's' and arranged them in various ways on my coloured papers from the previous exercise.
they are all fairly self explanatory, here grouped together
above randomly sprinkled
opposites
i used the stencil and cut some voids and arranged various cut 'R's' on top
more arrangement and ways of linking shapes
above 2 'R's' slotted together to make a group of 8's
Exercise 2. i used the negative piece i cut from my stencil to make some overlapping shapes with chalk pastels and my fingers
then above using various cut 'R's' offset
then more above
to which i coloured the voids in with the stencil and then below added more cut shapes.
it was at this point i discovered i had missed Bristol's Graffiti festival! but hopefully the work will still be on the wall when we go next. i am now folding paper for the rest of Chapter 9 so more to follow.

Sunday, 28 August 2011

Chapter 9 a long time coming Section A

Chapter 9 is a design exercise with the aim to explore ways of using colour. two contrasting colours were chosen, i made a conscious decision to avoid green! so i chose a Lemon yellow and Deep violet. the aim was to paint one section of paper with each 'neat' and then mix the two equally for the colour in the middle and then work with this mixed colour adding a bit each time to the originals to create a tonal range. i loved the brown colours that were created even though i don't particularly like brown! i used the paints straight out of the tube and used a decorating brush so there are some interesting striations in the paint samples.
next was to make interesting combinations using the painted pieces. somehow i seem to have created some 1950's designs made all the more interesting because of my wood panelling effect!


Exercise 2 these were then added to different backgrounds created with the same colours. i kept the painterly quality of the brush strokes and did in fact dilute the paint this time.
having said i was avoiding green i seem to have achieved it slightly with the use of the lemon yellow over the violet!

#2 Exercise 3 using the same choice of colours and with the addition of white i created a gradual tonal effect from yellow to pale yellow. strips from other tonal pieces were then added. the middle one was cut from a strip using yellow and payne's grey.
#3 the same exercise but using an added tonal strip of violet and payne's grey. More of chapter 9 to follow

Sunday, 9 May 2010

Alchemy and how clean is your house!

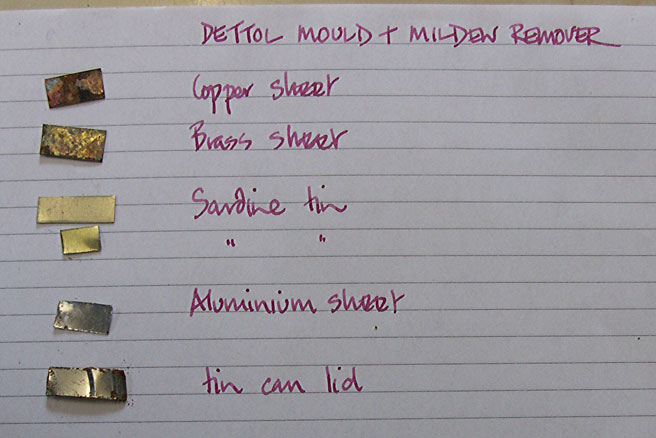
the second part of chapter 9 was 'playing' with metals and chemicals! seeing how the metal would react to certain substances and any patina produced. i had a quick tour round the house to see what i could find in the way of nasty substances and came up with the following. Goddard's silver dip, used to clean silver jewelry; Parazone bleach/toilet cleaner; Oven Pride oven cleaner; Dettol mould and mildew remover (its very damp here in the Wet Country); vinegar a mixture of white and balsamic and finally Liver of Sulphur (used to oxidise metals). we didn't have any yogurt and somehow it seemed like a waste of good yogurt to dip various metals in but i could buy a small pot!
the Liver of Sulphur is something i discovered recently when an oxidised silver ring of mine got scratched. someone at work said 'oh you need to re-oxidise that' and suggested Liver of Sulphur. now for the history lesson! apparently it's made from heating Potassium Carbonate with Sulphur and was known as long ago as the 8th century when it was first made by an Arab alchemist Jabir Ibn Hayyan. each batch is apparently different and produces different effects on silver and copper.
the above and next few pictures show my 'experiments' on various metals with my chosen chemicals. hope they aren't too boring. the best results in each case were on copper and brass.
Aluminium remained relatively clean and shiny whereas most chemicals seemed to corrode the tin cans.
the oven pride did something nasty to one sardine tin leaving only the plastic coating behind!

i knew that Liver of Sulphur worked well on silver but it was a great surprise to see a lovely dull 'patina' on the copper and it then dawned on me 'why not try masking some areas?' hence the small samples on the right.

i then tried further experiments. 1 shows copper, stainless and brass mesh burnt with a candle. besides the wonderful colours i achieved i love the sooty deposits. i have no form of heat gun! in the middle of stinking the house out a canvasser came to the door! not sure she believed me when i told her what i was doing.
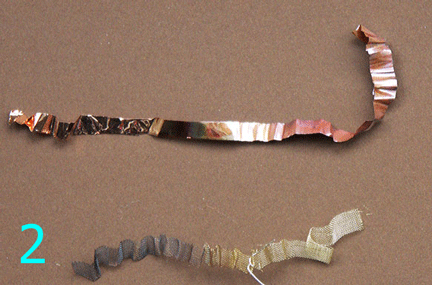
2 shows a very thin strip of copper and ultra fine brass mesh burnt and scrunched/pleated.
3 tomato puree tube, just as Sian says has a wonderful colour inside. i love pleating things so tried with these. the orangy bronze colour is due to a 'plastic'? coating on the metal. once i had pleated or folded i scratched away the coating with sand paper, carefully as it tends to break fairly easily. i also found my fathers old hammer and impressed various cutters and shapes into them. the one on the left i cut into and turned bits back.i am now waiting for my husband to finish his tube of harissa to see what that's like inside (i can't take the heat or it would have been finished ages ago)!
4 the top one i used the outside of the tomato tube making holes with a needle and scraping away the printed covering. the 3 on the bottom right are all aluminium punched with a needle and sanded to give scratches to the metal, i have then rubbed wax crayon into the scratches. finally the one on the lower left has been punched with a tiny screw driver.
next ones above are copper. the top one has been pleated and hammered then masked with sellotape and oxidized with the Liver of Sulphur it was then patinated in 3 of the un-oxidised areas with Cupra, then the patinated areas were waxed by rubbing over with a candle. it gives a nice sheen and i think protects the patination. the lower one has been embossed with a cookie cutter and then patinated with Cupra and finally sanded over the raised areas.the final pieces are on copper mesh using shibori techniques and all treated with Liver of Sulphur. the very top one above is an ultra fine mesh which was pleated the next one down was also pleated in two areas and i stitched a line of coarse running stitches to see if that would work as a mask but it didn't really work. the lower one was pleated in two directions. i found there is a definite 'art' to how long to leave them in the solution, too long and it obliterates the lovely copper sheen.
with the last one i was getting very excited and thought i would try twisting the mesh with fine beads inside it didn't need to be tied as just twisting it held. it is so like a textile i am sure there are endless possibilities!!!