 Just thought i would mention Fibrefest on 20th and 21st August at Bicton College in Devon. Usually a great shopping experience! if anyone is going and wants to meet for coffee let me know.

Sunday, 31 July 2011
fIBREfEST August 20th and 21st
Just thought i would mention Fibrefest on 20th and 21st August at Bicton College in Devon. Usually a great shopping experience! if anyone is going and wants to meet for coffee let me know.

Friday, 29 July 2011
Day 12 and 13 sketchbook slow but enjoying
 for colour i chose the above, my favourite mug, one of my spray painted tulips and a sprig from a tree
 like Sian i used Koh i nor dyes which i bought at Urchfont and have fallen in love with them. i also applied chalk over the top.
 first attempt, i didn't really read the instructions so this is what i came up with!
 i then changed the tulip to my feather which had a few highlights to follow the instructions on using water and merging. for this one i used the Koh i nor and chalk for the background and water colours for the counting by numbers bit.
Sunday, 24 July 2011
sketchbook pattern
 i wanted to try some lettering so got out a wagamama t. shirt
 first one above wasn't really working, so i continued below
 and now i think i prefer the first ones simplicity anyway i am calling a halt for today
Sketchbook Day 7?
 i'm getting confused with the days here but above feather pattern, however it could also be the individual shafts!
 i chose a paper bag for the next challenge and below finished bit, i used a brush ink pen.
 decided to try a piece of newsprint with the feather pattern.
Chapter 8, mainly option A or perhaps not after looking back at the post!
 Foolishly perhaps i mentioned to Sian in my tutorial at summer school that i really wasn't sure which option to choose for this chapter, option A transferred images or option B heat set shibori. she suggested i could do both! so i came home thinking 'why had i opened my big mouth' and decided to go with option B only, however i kept thinking of the shibori and so the following is inevitably a mixture. Option A, make a slip from a printed image using transferred or direct digital printing. I have Maggie Grey's book 'From Image to stitch' so i have already tried direct printing onto Japanese tissue and organza. For this i chose a method which uses a bonding agent as a transfer adhesive with a printed image. I enlarged my slip slightly for this chapter. basically a piece of Bondaweb is ironed onto fabric, then the printed image face down is ironed to the Bondaweb and then the paper sponged gently to absorb water and the paper rubbed off (i used my finger) to reveal the print layer. care has to be taken not to wet it too much as the ink will bleed and the image can also be rubbed off if you are too heavy handed. i chose initially 2 pages from my sketchbook seen in the photo above. i used cotton organdie and silk organza. i liked the process of this method and can see myself using it. the slip on the bottom right was from a shiny photo print which gave a duller image so i applied a layer of varnish which showed the brush marks too much.
 it was at this stage i thought of shibori, i liked the idea of a series of slips all lined up like growing flowers. i experimented with a few 'methods' thinking how to achieve a slim slip with just a stalk so image 2 and 3 is my 'wrapping a parcel' method! the finished slip is in image 1. i cut a wooden slip which afterwards i thought should not be wood as it could transfer staining in the 10 minute steaming process. i was lucky.
 once the slip was dry i undid the cotton ties and voila it stayed put but i did find the silk organza worked best.
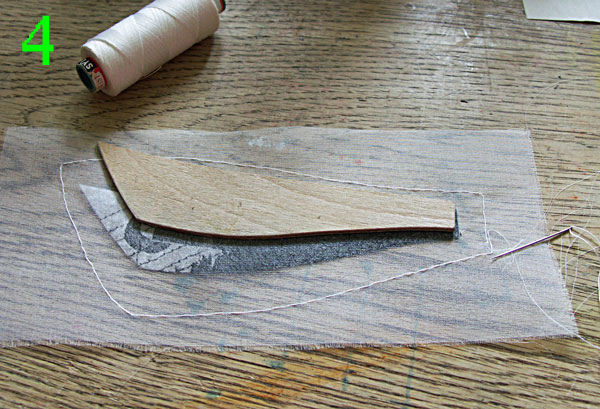 # 4 and 5 i then made an experiment of stitching round the image, placing the wood slip inside and pulling it tight and then securing the reverse like a seam.
  and then steaming.
 #6 i decided to make a series based on the stitched paper i made for chapter 5. with the lettering i had to remember to flip the image before printing otherwise the letters would be back to front. the plan was to superimpose the slips onto the original photo.
  #7 shows the slips on their sides and the thickness of the form. with these slips i applied a layer of PVA to the image which made it a bit fresher looking. i also tried colouring the silk before transfering the image but that didnt look right!
 #8 the actual slips had added hand stitch which was basically a looped back stitch worked along the original stitch lines of the paper. i worked this while the slips were still tied to their wood form. the stitching was continued on the same lines on the background photo but just a simple over under.
 #9 the best way to keep the slips in their correct places was to suspend them on fishing line from a frame above the original print some are slightly out but it wasn't easy to get them in the exact place. i was helped by an amazing book 'Memory on cloth Shibori now' by Yoshiko Iwamoto Wada its well work the money.
Friday, 22 July 2011
Sketchbook Day 6 i think
 shadow achieved with lamp! not sunshine unfortunately. i used a mixture of biro and pencil with water. hope it cheers up for tonight's year 6 leaving party at the open air pool!!!
 working bigger using chalk pastels which are square so easy to get fine and thick areas. Off to work internal lines now.
Wednesday, 20 July 2011
Summer Sketchbook challenge- first few days
 i seem to be rather behind everyone else but here goes so far. i chose a feather as my object and contrary to my ideas with coffee which might be rather messy i used a tea bag of my husbands to colour the pages with dabs of gesso and masking tape masks. not sure i have followed your instructions to the letter Sian but the above is using graphite line and a bit of shadow with water to merge the line.
 i then chose a second feather using fine brush with added lettering
 Day ? using pencil with water and ink. so i am now off to put a strong lamp on as it is sooooo miserable out there
Subscribe to:
Posts (Atom)