Showing posts with label graffiti. Show all posts

Friday, 24 May 2013

Return to PAPy bread

short recap on my proposal and where i am going with it.

Budleigh beach in East Devon
 Plan is to make a site specific piece for this beach based on graffiti but silent. see previous post here


windmills
i have finally chosen my graffiti sound, a sound totally out of place to a hopefully cold and quiet beach. i intend to record the sound of my son on the computer and his inane banter he has with his friends on Skype. with a c 60 tape; 1 hour to those of you who don't remember cassette tapes. i have worked out i should be able to make 60 windmills! Oh i love repetition.

various nets
i have been investigating how or what to attach the windmills to. originally i was thinking of having them en mass sticking up from the beach and i know Siân had mentioned to me Anthony Gormley's beach bodies is a 'whole' piece and not physically linked but as this really is a 'single' piece i have been thinking of ways to connect them.

i like simple so after going off at a tangent with windmills in boats which i decided was not in keeping with the idea behind my initial thoughts i have been investigating fishing nets. the idea to attach the windmills to a net so they can spin. i have tried various samples using paper thread, fishing line and finally cotton Perle.

i have taught myself to make fishing net thanks to the power of you tube! i made my own shuttle and done various experiments. fishing line did my eyes in though i love the idea of the transparency of it.

making new rows of loops with a spacer
experimenting with resin
Perle is quite floppy and i was thinking i would need something more rigid so i have played with soaking the finished piece in resin which has the desired effect.

However i have had an epiphany and think that because the use of the Internet and Skype is essentially an 'enclosed' activity i want to collect all the windmills into an enclosed net, so bits of 'noise graffiti' will leak out.

and this is for you Siân!

i came across this here some time ago when i was putting my proposal together. 

Friday, 10 May 2013

Bonded layers (Chapters 9 and 10)

Chapter 9
it's taken me a long time to do this chapter, can't say its been my favourite, till i got to the 'Resolved' pieces!! any way here goes.

the idea was to make lace like structures by applying 'bits' of things to an adhesive layer, i used a 'Bonda web' which i had got from Whaleys. my first piece i sandwiched between adhesive ( sample 3 ) but then i decided it worked just as well on a single layer. 

Note Siân the scale!

these are left over scraps of japanese paper i had inkjet printed on 
this sample i painted the adhesive layer and used old 'used' bits of sellotape i had taken off the back of some old photos it had that lovely old yellowness and had lost its stick
offcuts of thread

 the next thing was to cut out shapes of these 'lace' bits and attach them to back grounds. the piece above was a remnant from last years summer school with thread 'lace' and a sample of black silk fibres i had formed into rings and applied to the adhesive. can't say i like this one

for this piece i coloured the adhesive with liquid graphite and stuck black plastic pieces i had removed from a piece in Chapter 8. it was then attached to a sample from an earlier chapter


Chapter 10

Nylon layer with bonded silver leaf, rusted plastic and garden fleece.
the above sample uses stitched elements and then heat to melt through the various layers and thus bonding them together. 

Resolved Sample 1

using letters to create individual elements
i wanted to get back to some colour! some time ago i bought a pack of light sensitive fabric which i had never used. so i used an old piece of type to cut a stencil and placed it on the fabric in bright sunlight(!) in a couple of areas, top left and far right dark green 'K's. you then wash the fabric and this leaves the 'set' image visible. i then placed a dark blue nylon layer on top and cut out 2 'K's from my 'lace' pieces and attached them to the piece (top right and bottom right). i then stitched lines across the background and then took a heat tool to it to reveal the green underneath. finally i cut a metal  'K' and held it in place with more of the blue nylon and an adhesive layer and emphasised the silver with stitch around the other 'K'.

detail
Resolved Sample 2
i was thinking about bonding more than just a few layers and wondered whether i could create real bulk. i was looking back on my sketchbook and thought of using this as inspiration, instead of going downwards i wanted to go up!

image on the right

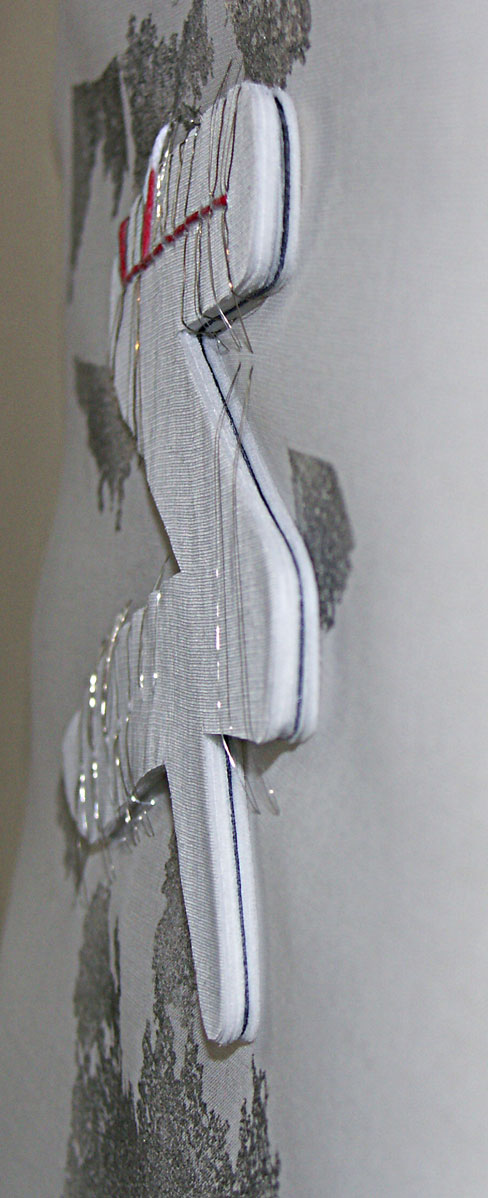
image created by bonding 36 layers (approx) of cotton organdie


it measures about 5mm deep

my first layer was paper, the black line seen half way through, i then built up layers, it was very labour intensive but i am really pleased with the outcome. half way through i had had enough but didn't think it was thick enough so i came back to it and worked from the other side. i drilled the holes and attached it 'a la Gulliver' to a single layer of organdie. the bonda web on the background i coloured by spraying with spray paint. i think i would like to investigate this further when i have the time and patience!

Sunday, 23 October 2011

Bristol@last

we got to Bristol at last combining Nelson Street, Louise Bourgeois/Tracey Emin exhibition and relatives! typically we chose a day when there was road resurfacing going on so our views were marred by lorries! however that didn't stop us enjoying it (us being myself and 11 year old). he was doing the directing as to which ones to record! there is an amazing amount of variety and the following are just a small handful.

we were walking down the street and my son said 'that's a good one', i said 'where'? looking all around! how could i have missed it? i have since seen a video on 'the Wooster Collective' where the artist said it was based on 'paint the town red'
beautiful lettering

this chap had 4 arms and legs!
Free Tibet, a cause dear to my heart

dust graffiti!

i hope the Tracey Emin/Louise Bourgeois exhibition at the RWEA hasn't traumatised my son but it was worth it for the Damien Hurst sculpture outside! So that says it all!

Sunday, 13 March 2011

Chapter 10 Option B 'folded cut lace'

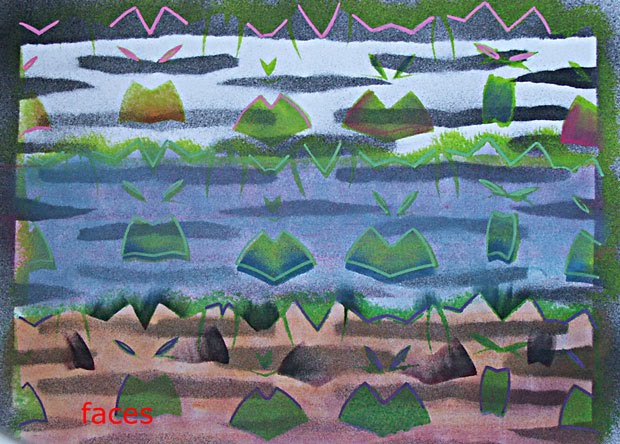
this option develops the use of stencils to create designs. Using paper folded and cut with shapes various 'doily' designs were created. the shapes i used were letters, arrows and random torn shapes. 'faces' above was based on the wonderful letters i used in the 'edge' chapter. i concertina'd the paper randomly to get a repeat that was not uniform. much to my surprise i created a row of faces which looked quite graffiti like. for this one i used 2 stencils, the background of folded and torn holes. i used spray paint, chalk pastels, markal paint sticks, acrylic paint and a new find 'uni posca' pens which give a brilliant colour. the pink and green lines above. i transferred the cut designs from thin paper to card which was easier to work with.
'letters' above uses 2 stencils and only parts of them. again using the same materials.
'y's' similar to 'letters'
'm' using both positive and negative stencils.
'flower' using 3 stencils randomly placed.
'arrows' not so pleased with this one but it has a certain 1950's look. i used biro to give a more lacy appearance to the arrows.
'grin' was based on an actual doily folded and cut randomly. it was quite difficult to use this as it was very flimsy to stencil over.
i also worked various strips using the stencils, cut pieces from the stencils and the stencils themselves to create stripes. top stripe uses an actual stencil with pieces cut from the doily. next one down another stencil made from 'The Radio Times' and cut outs looped through it. the lower one using just stencils.
this last one shows top created with positive and negative stencils with cutout bits of photos. next one down uses various sizes of arrow both positive and negative and cut outs. i still have a section designing on the computer but that will follow.

Sunday, 16 January 2011

Chapter 8 'To the Edge' and beyond! Sounds like Buzz Lightyear!

Chapter 8 part 1 asks you to choose a piece of textile to cut into 4 and extend the design in any way so it can eventually be made into an 'edge'. i chose, after a lovely saturday visiting the Gloucester Road charity shops in Bristol, a child's T-shirt. i love things that are slightly asymmetrical or quirky so this was ideal. the module says it can be scanned and 'made your own' which i did and as you can see in the last two pictures i have changed it completely.
#1 quite simple using chalk pastels, tissue paper and pen.
#2 using stencils based on the original shapes with paint, chalk and pen.
#3 i turned the image into black and white, playing with the contrast. using quink ink over aquawax stripes with paint and chalk over masks. i was given an electric whizzy 'dymo' for Christmas, so the added stripe is printed with that!!
#4 more adaptation to the original, the extension being worked with chalk, paint on stencils and felt tip. great fun to do! now onwards to some actual edges and possibly some stitch!

Sunday, 13 June 2010

Faces

i've decided to work on heads and faces for the next chapter of work and there will be more in my next blog but meanwhile i have been thinking 'how little you can portray or get away with' when drawing a face for it still to look like a face! above a very cute bit of graffiti with minimal face seen in sunny Bridport a few weeks ago!

Friday, 30 April 2010

Graffiti, long time no spray

i realised i haven't posted about graffiti for a long time, so here we go! when my guys came back recently from edinburgh, my pressie, besides a tripod was this 'Fatcap' kidrobot. for any of you who have never come across these 'designer toys' they are based on spray can nossles used by graffiti artists, the fat cap being one style. they come in their own boxes and it's a surprise as to which one you end up with! my little fatcap is only 3cm high, he rattles when you shake him like a spray can and he is called 'feed' and comes complete with his own pigeon and pigeon poop!!! he is part of the fatcap series 2 all designed by a group of graffiti artists/writers. he has pride of place on my shelf!!

on a more serious matter, and care of Karin via Sian i saw a video clip about a paralysed graffiti artist Tony Quan aka TEMPTONE who is now using a low cost tracking apparatus and custom software to create graffiti. amazing.

Monday, 14 December 2009

Leaf graffiti and plastic bags

have you ever noticed the wonderful shapes left by leaves at this time of year? the pavement has to be just the right kind of surface for an impression to be made, just like the plastic bags i am using for my 3D lights! i spent quite a while sourcing a white plastic bag for my samples, cut into approximately .5cm wide strips, knitted and then melted! did i have enough for the whole project? of course not! several plastic bags later and not the right kind! the newer 'compostable and biodegradable' kind do not work as well as ones with i think more oil in them! i have finally sourced one from 'the works' and thanks to my son who wanted an A2 drawing pad it is large. never one to do things the easy way and after 7 hours of tv watching i now have a wonderful 'heap' of cut up continuous strip and repetative strain injury in my shoulder. will i have to go back to 'The works' again? probably, so you know what i will be doing over Christmas!

Friday, 4 December 2009

3d monster lights (samples)

i have not been idle with my 3D samples and at last i feel i am getting somewhere,or at least I am happy, i will see what Sian says! anyway to recap, the proposal is to make a series of small/life size 'cans' that can hold LED tea lights. i have been thinking along the lines of 3 or 5, no reason for the numbers although i think 5 would make a good line up.
initially i started by getting the lid shape i wanted; the ears will slot in along the top seam.
it took quite a long time to get the shape i was happy with, firstly working out with paper and then using a foam shape for stability.
the actual lid/head will i hope be made from various layers of plastic stitched together with a metallic thread to indicate lines taken by graffiti artists. the seam was sewn with a clear nylon thread, over sewn and then the seam flattened out. the ends will have 'tags' attached to them. above on the left side the ends have been dipped in silver sealing wax.
on the other side above i have dipped the ends in paper pulp.
for the mouth and eyes i have done some samples of free machining on soluble fabric. the mouth is about 3cm wide.
for the main body my plan was to impregnate cotton organdie with a paper pulp. the pulp was made using recycled paper. my initial samples were on white organdie which i wasn't happy with. so i decided to stencil the organdie first.
first sample above i was not happy with as the pulp was too thick.
next sample i was a bit happier with as the pulp was nearer to how i wanted it. however i was still not 100% happy and the pulp had a tendency to peel off the organdie.
i then started out on a tangent! which i am really pleased with. one of the reasons i like graffiti is the lace like quality of various tags so i started experimenting with knitted and melted plastic bags.
this has given me a perfect substrate for my paper pulp and although the holes are quite structured they are random enough.
my plan is to start with a complete substrate on the first light and gradually i will remove areas based on a stencilled tag. when i dipped the plastic in the pulp and turned it over i had placed it on a plastic surface which when i pulled it off the pulp pulled upwards from the knitting. this was originally the reverse but i love the way this gives a raised surface to the pulp. i tried colouring an area but felt that i liked the white surface which will have glitter in the pulp, like a wall surface ready for spraying.
finally going back to an earlier sample of a paint streak i have applied a similar 'streak' to the sample. it curves beautifully around a can. i intend to add the paint streak to each 'can' so when they stand together it appears as one streak! i am hoping i can go ahead and make them up, my husband would like the paper pulp out of the fridge by Christmas?!